Electric Shower Problems | Electric Shower Fault Finding | Electric Shower Diagnostics | Electric Shower Repair
This article explains how an electric shower works and lists some of
the most common electric shower faults along with their symptoms. It is a
diagnostic guide and cannot cover every make of electric shower.
It can be a daunting task to engage in fault-finding an appliance if
you know nothing about it. Knowledge is everything. Familiarize yourself
with the information here and obtain a diagram of your shower’s
internals. You should be able to identify where your fault lies quite
quickly with all this information.
I found this site, showerdoc.com extremely useful for video help and to obtain spares very quickly.
And it goes without saying: Electricity can kill.
Always ensure that your are working safely by isolating your shower
electrically before commencing any type of work on it. If in doubt,
contact a competent electrician.
Typical Electric Shower Components
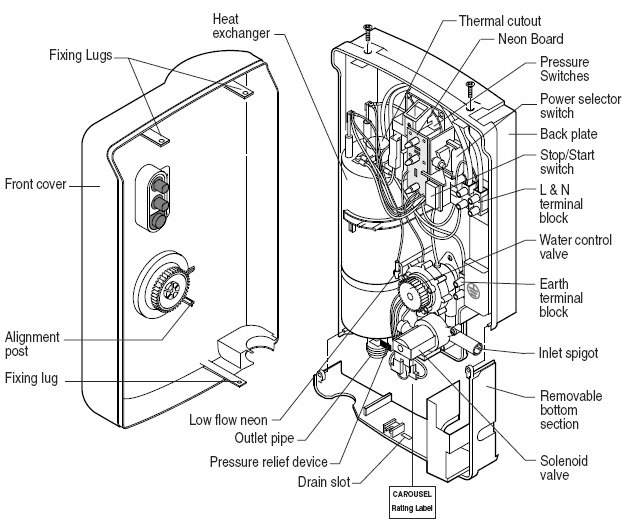
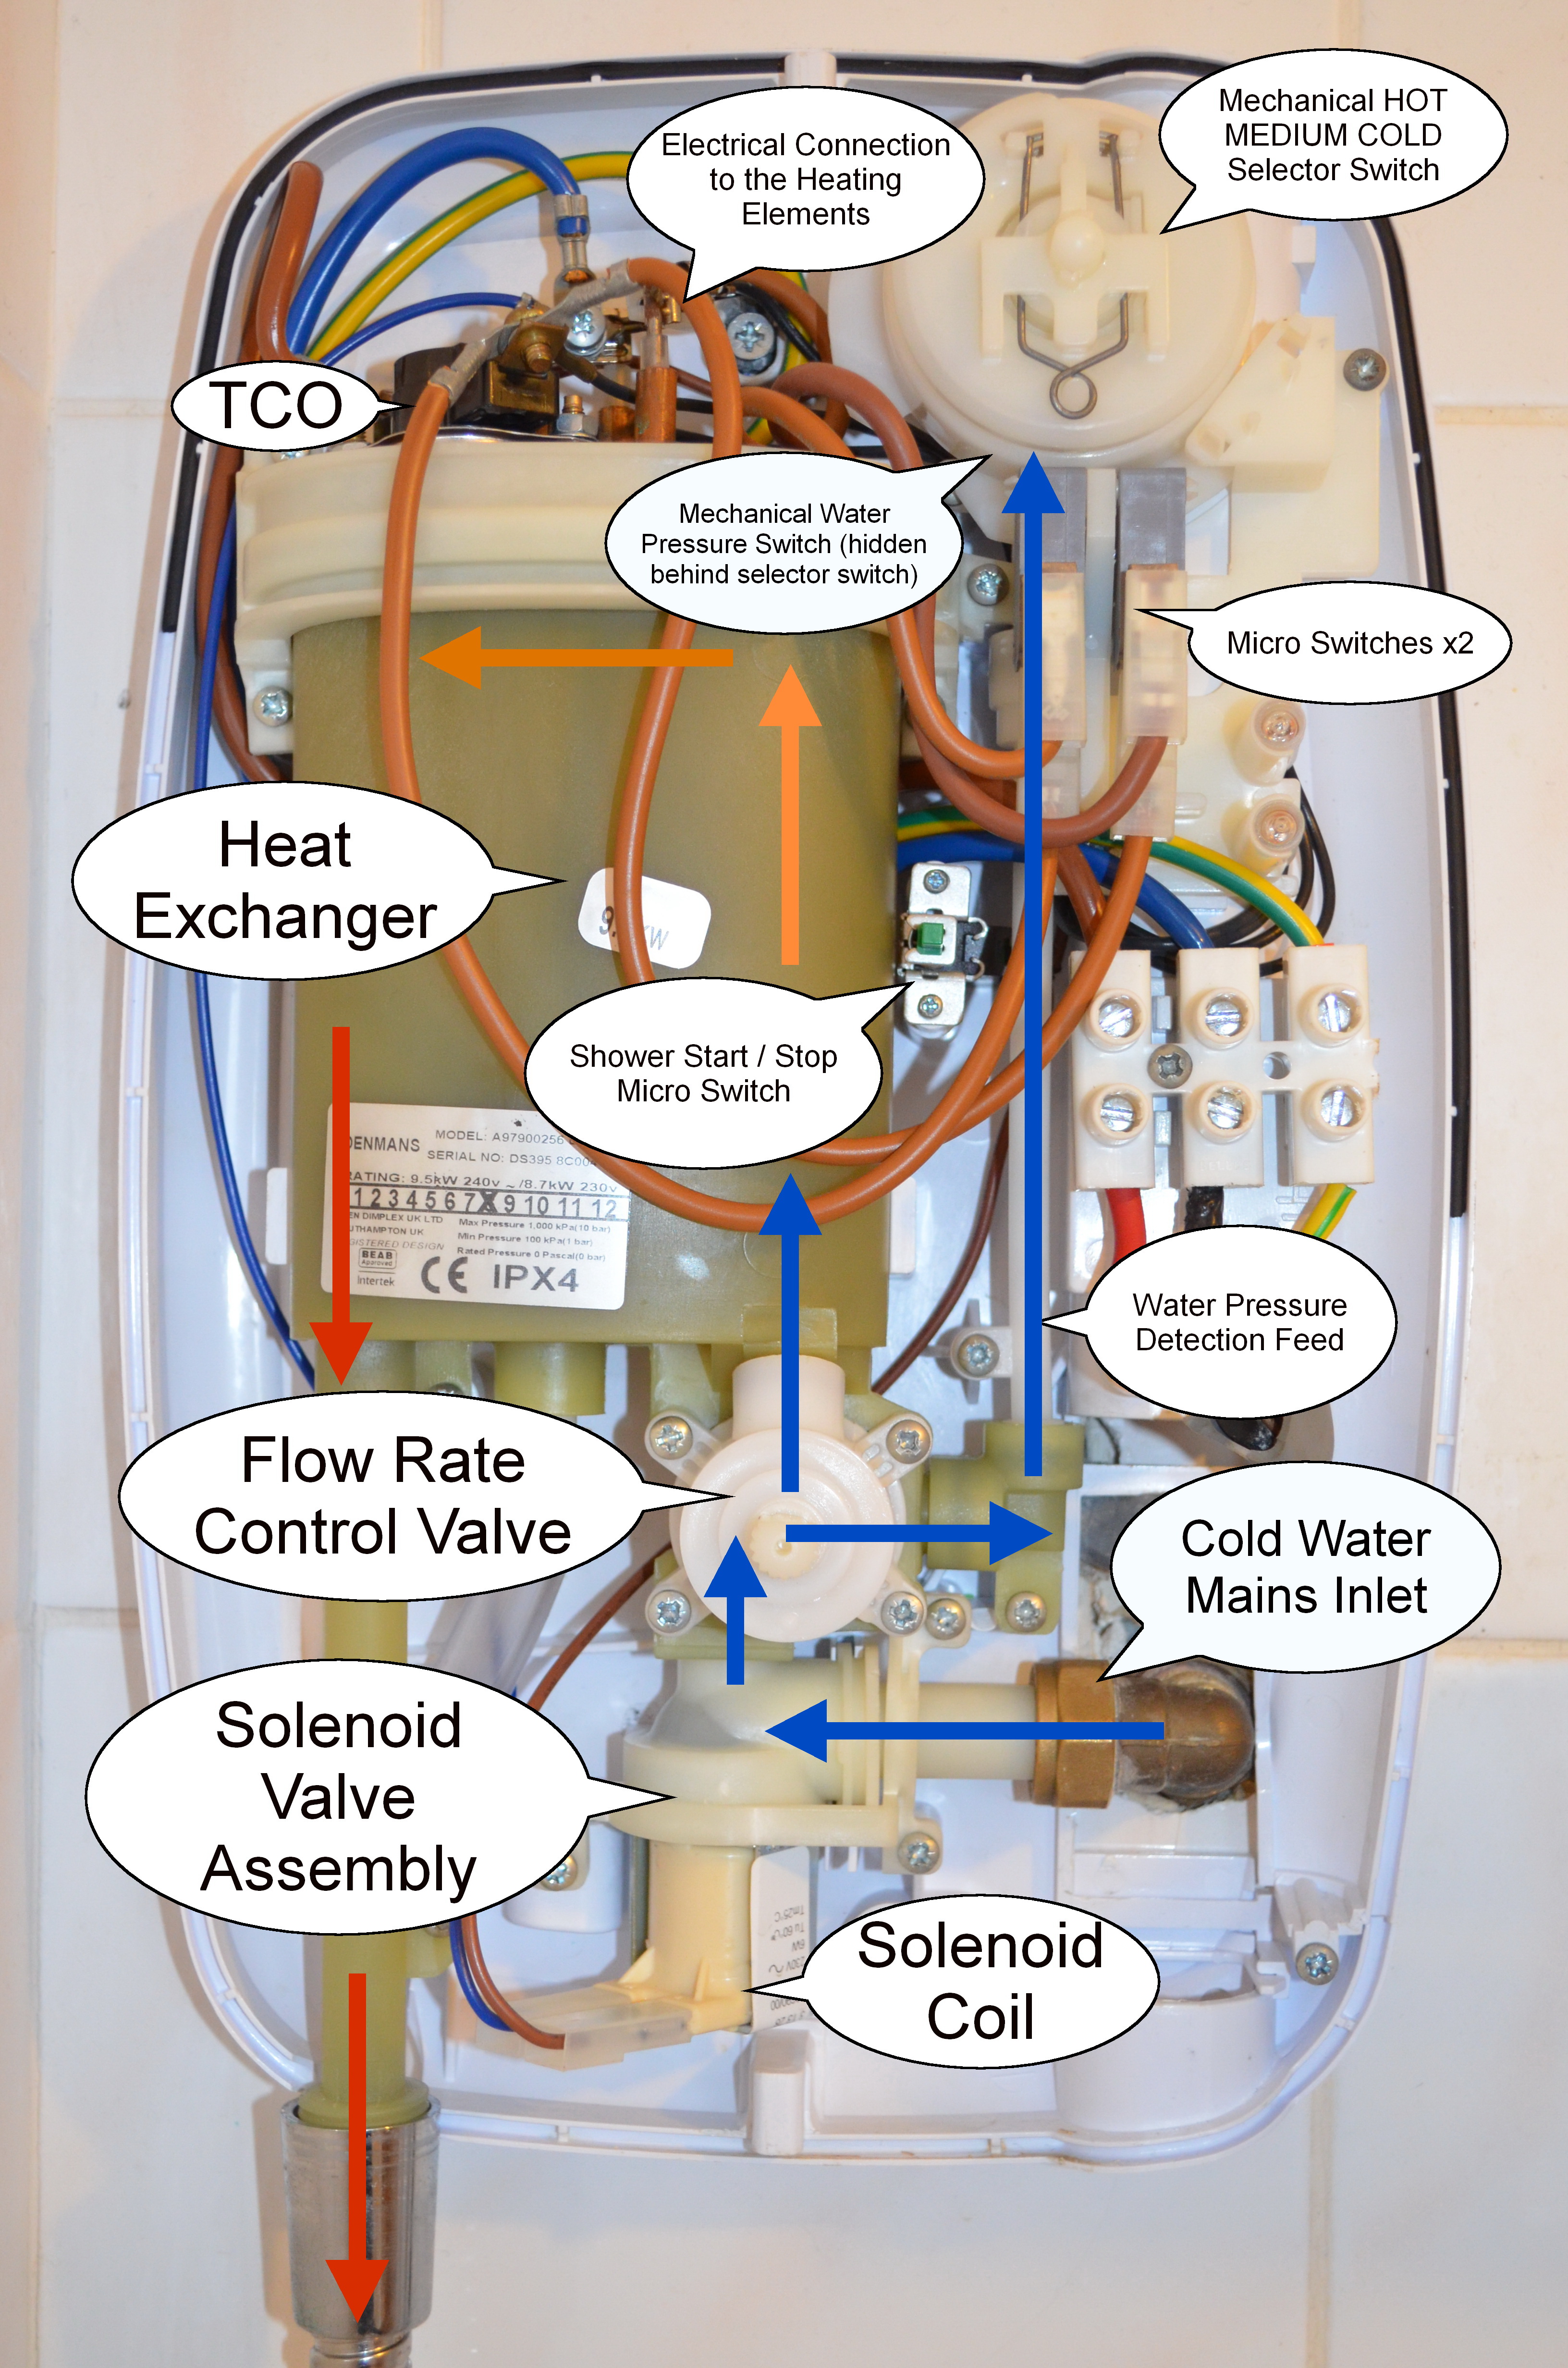
Shown below, is a schematic of a typical electric shower and a photograph that illustrates what the parts of a shower look like. Schematic: Typical Electric Shower ComponentsLabelled: Electric Shower Internal Parts
How an Electric Shower Works
Schematic: How an Electric Shower Works
When the user starts the shower by pressing the stop/start button,
the flow control valve lets in the water. If there is sufficient water
pressure, the pressure switch will turn on the heating element(s).
The element(s) in the heat exchanger will start to heat the water as the water passes through it.
By controlling the flow rate of water over the heating element, the
output temperature of the water can be controlled. Reducing water flow
rate increases water temperature since the water is in contact with the
heating element for longer. Increasing water flow rate will reduce water
temperature accordingly. The graph below illustrates the relationship
between water flow rate and the rise in cold water temperature for a
typical electric shower with a heat output of ~9.5KW.
The Relationship of Water Flow Rate to The Rise in Water Temperature in a Typical Electric Shower
It should be noted that the temperature of the incoming water supply
varies throughout the year. It can be as low as 5°C in winter and as
high as 20ºC in the summer. This affects the output temperature of the
shower on a seasonal basis. You may find that during the winter months,
you have to turn your heat selector dial further into the red; slowing
the water flow to achieve a water temperature you have become accustomed
to.
Some electric showers have high and low settings to give further
control over water temperature. This is often achieved by operating just
one heating element instead of two.
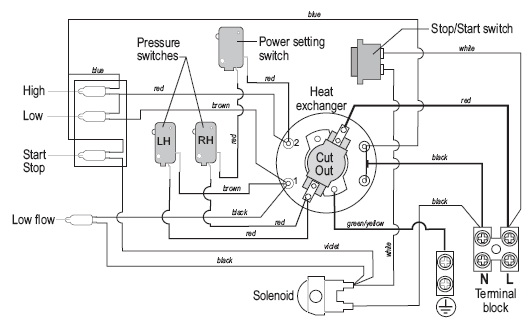
Electric Shower Wiring Diagram (Typical)
Schematic: Typical Electrical Shower Wiring Diagram
This is the typical wiring of an electric shower. And it’s invaluable for fault-finding.
Essentially, there are two separate circuits:
A low power circuit (small diameter wires) that operates a solenoid valve to start the flow of water into the unit .
A high power circuit (large diameter wires) that controls the
heating elements in the heat exchanger and is switched on when water
pressure is detected.
It is recommended that you seek the wiring diagram for your particular electric shower model to assist in fault-finding.
1. Electric Shower Low Power Circuit: Stop/Start Water Flow
Stop/Start Switch
Pressing the stop/start switch operates the solenoid valve (see
below) that lets mains water enter the shower unit. It also supplies
power to the neon lights. When power is switched off, the solenoid valve
closes and prevents the flow of water through the unit.
Common Faults with Electric Shower Stop/Start Switches
This wiring diagram illustrates that the Start/Stop neon will
illuminate when the Stop/start switch is switched on. If your electric
shower will not start and this neon does not illuminate, potential
causes could be:
No electricity supply to your electric shower. Check the obvious; fuses, a MCB trip, isolation pull-cord switched off.
The front cover of the shower may not have been fitted properly or
it may have come away from the shower’s back plate so that there is no
decent contact between the push button and the micro-switch inside. Take
off the front cover and replace, ensuring switch operation is good.
The micro-switch is faulty. Replace the micro-switch.
How an Electric Shower Solenoid Valve Works
There are many different designs of solenoid valve assemblies, yet
they all look very similar and usually have a detachable solenoid coil. Solenoid Valve AssemblySolenoid Coil
The solenoid coil is the part that generates magnetism when an
electrical current is passed through it. The magnetism attracts the
metal pin inside the valve assembly to allow mains water into the shower
unit. It is very easy to detach it from the valve assembly. Insert a
flat-bladed screw driver between the valve housing and the top of the
solenoid coil and lever the two apart.
Common Faults with Electric Shower Solenoid Valves:
Sufficient mains water pressure is required to keep this valve
closed. If mains water pressure is inadequate, water may pass through
the valve and cause the shower head to drip. Ensure that your stop-cock
is fully open and that you have full mains water pressure.
A damaged diaphragm will allow the constant passage of water through
the valve. Even though the shower is switched off, cold water will
continue to flow through the shower head. Replace the solenoid valve
assembly.
A failure of the solenoid coil will not activate the valve’s piston
and water will not flow into the shower unit. Replace the solenoid coil
or the solenoid valve assembly as a complete unit.
2. Electric Shower High Power Circuit: Heating Element Electrical Circuit
The wiring diagram (above) shows that this heat exchanger has two
heating elements. Each heating element electrical circuit contains at
least two switches in series, which means that they all need to be on
for the circuit to be made and for the elements to generate heat.
In circuit order, the following switches must be on for the relevant heating elements to operate.
Heating Element #1: Thermal Cut Out (TCO) + Pressure Switch LH
Heating Element #2: Thermal Cut Out (TCO) + Pressure Switch RH + Power Setting Switch
This means that:
A failure of the TCO will prevent both heating elements from working.
A failure of BOTH pressure switches will prevent both heating elements from working.
A failure of one pressure switch or the power setting switch will cause one of the heating elements to stop working.
Electric Shower: Thermal Cut Out (TCO) Switch
Shown on top of the heat exchanger is an electrical switch known as a
Thermal Cut Out switch, or TCO for short. This device senses the
temperature of the water inside the heat exchanger and if it detects
that the water is too hot then it shuts off the electricity supply to
the heating elements. It is there to prevent the bather from being
scalded. A Thermal Cut Out Switch (TCO)
Common Faults with Electric Shower Thermal Cut Out (TCO) Switches:
Under normal circumstances, a TCO may switch off and on repeatedly
if the incoming water temperature and selected heat setting is too high.
There’s nothing wrong here. It’s actually doing its job and protecting
you from being burnt. Turn down the heat setting.
A TCO can malfunction in a number of ways. It can fail completely
and consequently fail to complete the circuit for the heating elements,
resulting in no hot water. It could also fail by switching off then on
at random, resulting in repeated bouts of hot and cold water. If you
suspect the TCO in your electric shower, you should test it with a multi-meter.
If you don’t have a muti-meter, consider by-passing the TCO by
disconnecting the live input terminal (the wire from the terminal block)
and connecting it securely to the output terminal of the TCO. Don’t use
the shower like this as the scalding protection is lost. You can run it
briefly however to see if the shower produces constant hot water. If it
does, you know that the TCO is faulty.
Electric Shower: Pressure Switches / Micro Switches
Electric shower pressure switches are essentially micro switches that
are able to handle high current. They are switched on by mechanical
means when water pressure is detected in the shower system. Shown below
is an example of a micro switch with the on/off button in white: Electric Shower Micro Switch (Pressure Switch)
Generally, electric showers contain two of these micro switches to
govern power to two heating elements in the shower’s heat exchanger. The
mechanism that actually operates these switches is mounted behind them.
In the photograph below, the micro switches can be seen with the thick
brown wires going to and from them. Above them is the dial that selects
one or both heating elements in the heat exchanger. It is labelled as
HOT, MEDIUM & COLD on my shower’s face plate. It has 3 selectable
positions and should not be confused with the primary dial that controls
water temperature by altering water flow rate. Micro Switches (Front)
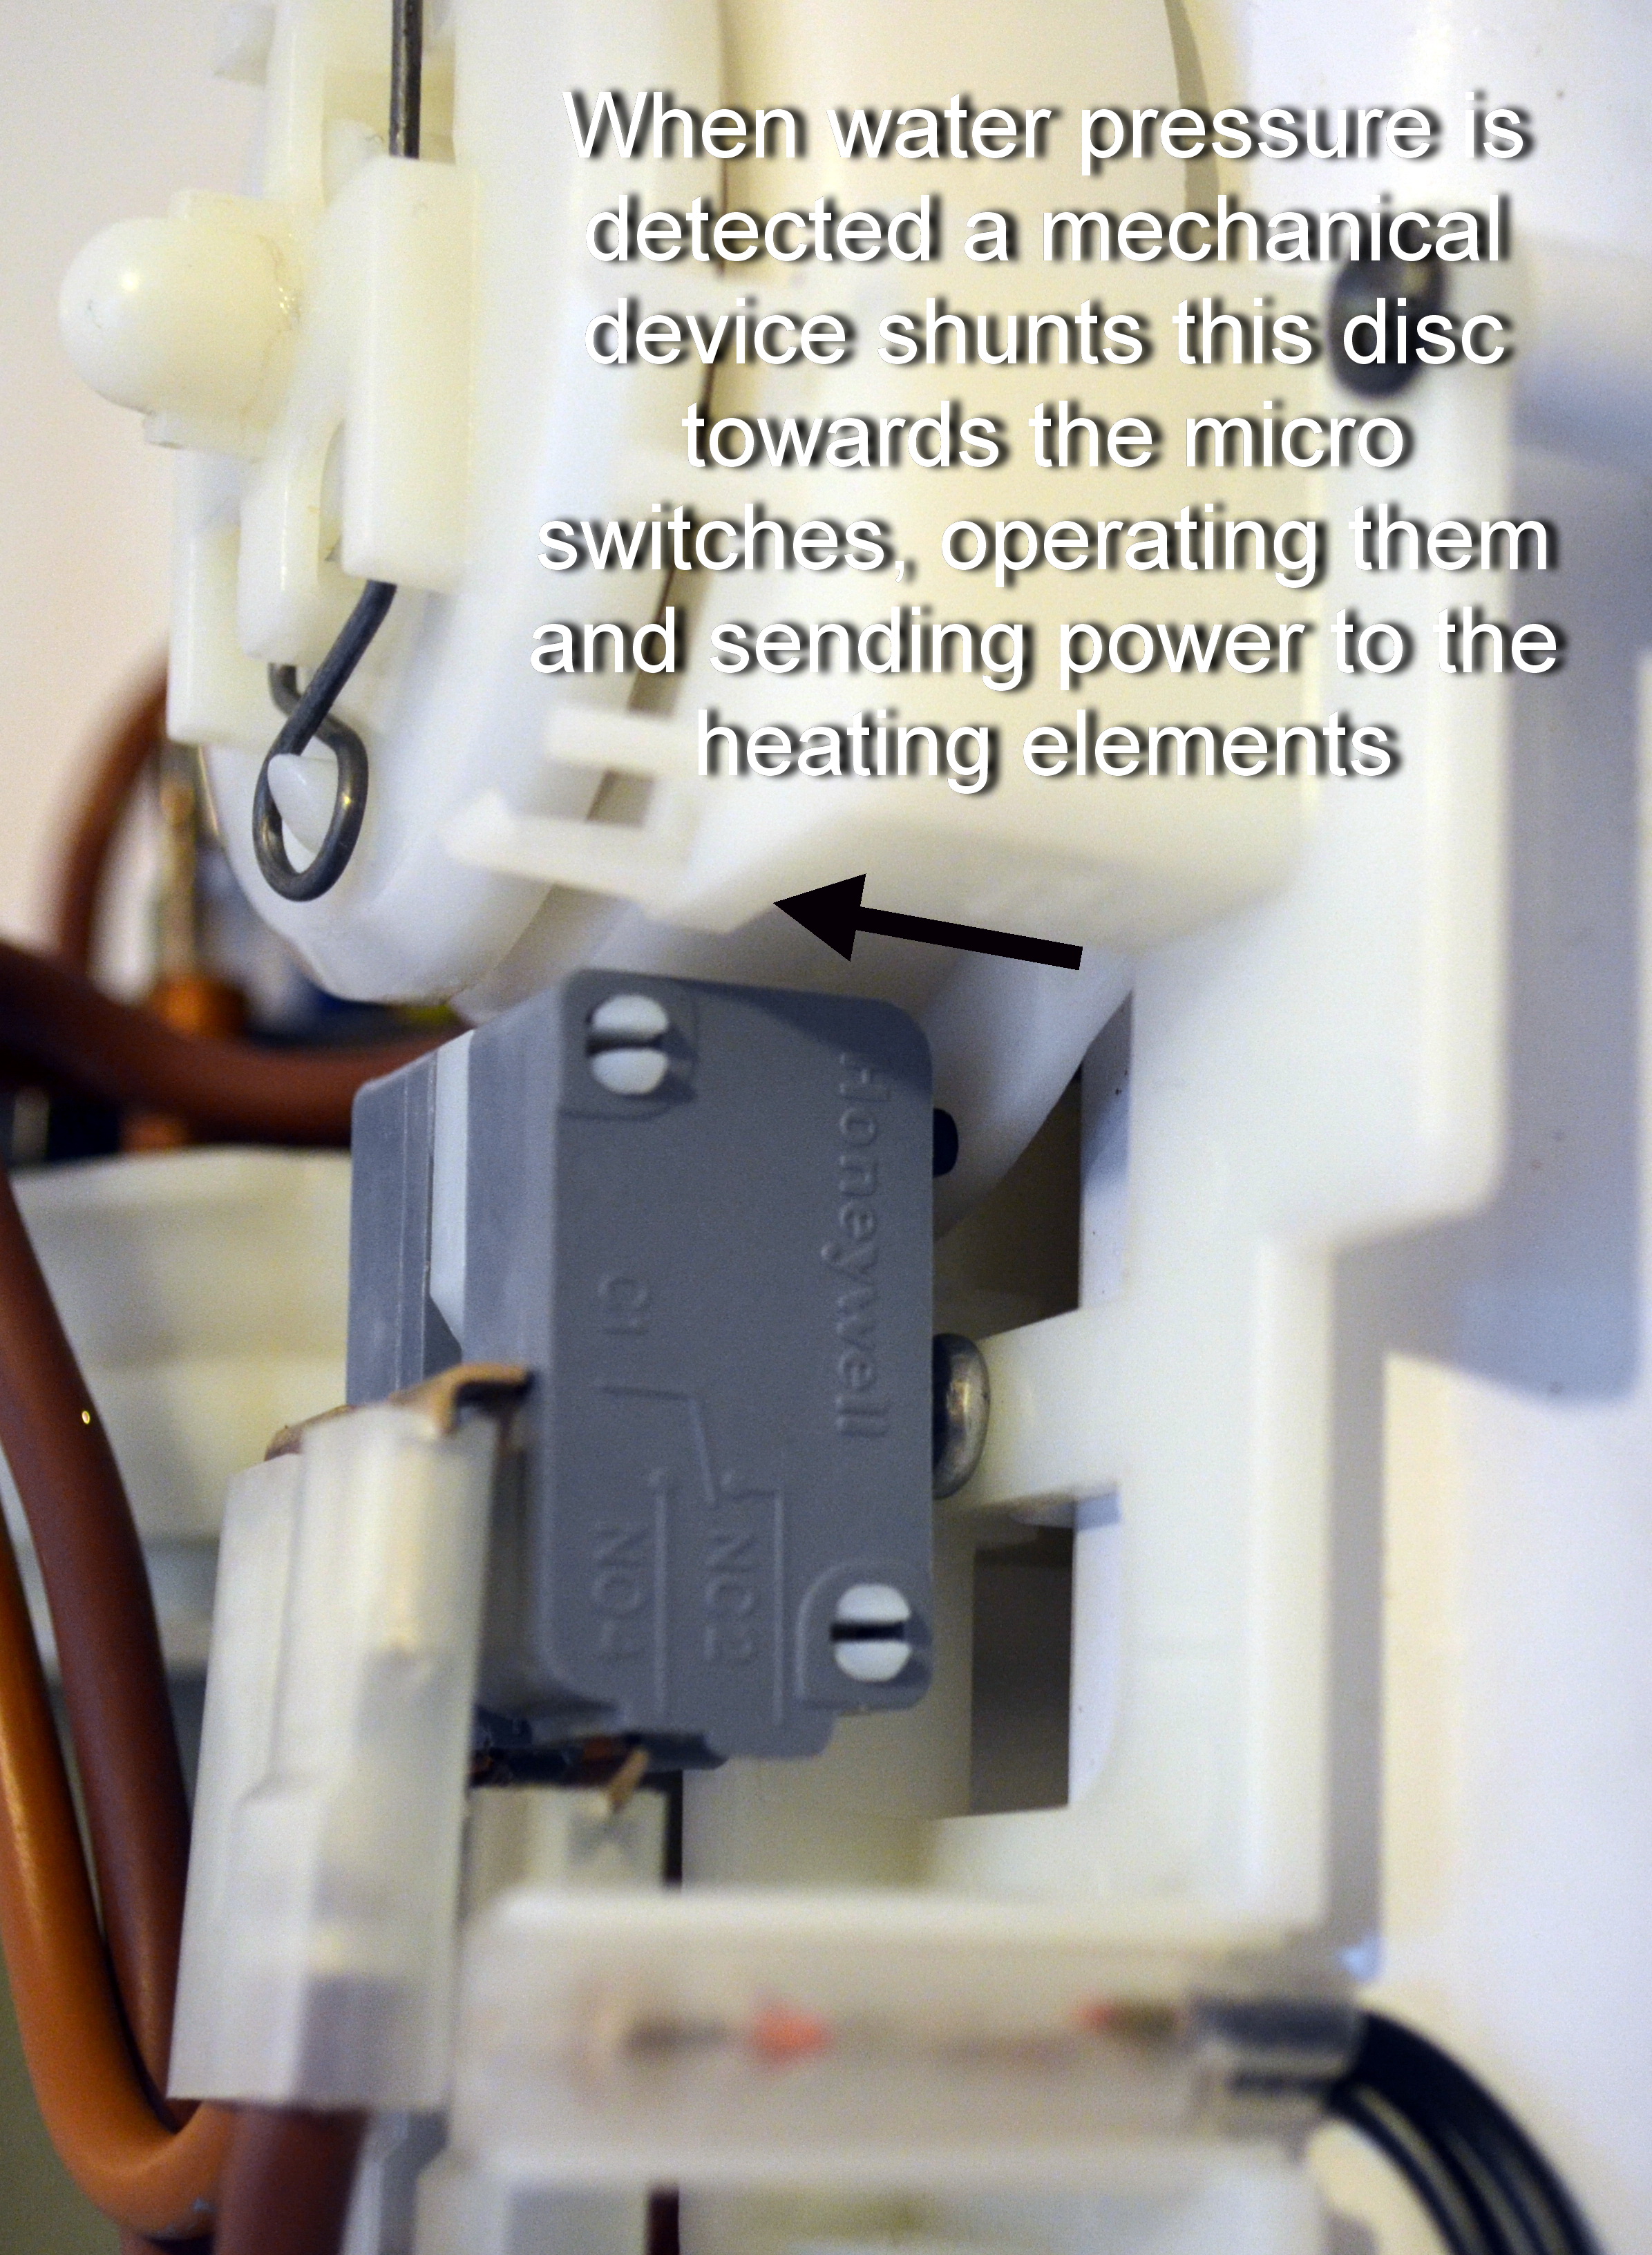
It can be seen that there is another plastic disc beneath this dial,
and it is larger in diameter. This disc is pushed towards the micro
switches when water pressure is detected in the shower. That movement
activates the buttons on the micro switches to allow electrical current
to pass to the heating elements. Operation of Micro Switches When Water Pressure is Detected
Note that there is a gap in the larger diameter disc and that the
three-position temperature selector dial is connected to it. In the
photographs, the dial is currently selected HOT and it can be seen that
the larger diameter disc will operate both micro switches when water
pressure is detected and the disc is shunted forwards towards them, When
the selector dial is turned anti clockwise to MEDIUM, the gap in the
larger disc prevents the second micro switch from operating.
Common Faults with Electric Shower Pressure Switches:
Look for signs of burning or melting around these switches. If any of these signs are observed, replace.
Check the operation of the mechanical pressure device. Make sure it
is free to move when electrical power is off. Observe it’s operation
with the shower’s front cover off and taking all necessary precautions.
If it fails to operate, change it.
Ensure that the coarse temperature selector dial is set to HOT and
that the corresponding mechanical device will operate both micro
switches. Check movement of the selector in conjunction with the
pressure switch and it’s orientation with respect to the micro switches.
Remove the pressure switches from their mountings and depress the
micro switches in the back a few times, then re-mount. This procedure
fixed the fault on my shower.
Electric Shower: Power Setting Switch
Power setting switches are electrical switches that can be selected
manually to operate a second heating element in the heat exchanger.
Common Faults with Electric Shower Power Setting Switches:
Check the terminal connections to the switch. Use a multi-meter to check switch integrity.
Electric Shower: Heating Elements
If you’ve concluded that the TCO and pressure switches are working
properly; the neon lights are functioning and you still have no hot
water, then the likelihood is that the heating elements have failed. The
only way to know for sure is to test the elements with a multi-meter. Electric Shower Heating Elements & TCO


0 Comments
Good day precious one, We love you more than anything.